CHECKLICK STOREFRONT SETUP GUIDE (START TO FINISH)
INTRODUCTION:
This guide is intended for Checklick Storefront users but perhaps you're also searching for a payment and registration system and want to have a look at what settting one up entails.
This 11 step guide will take you from "Ok, where do I start?", to, "Here' a link to my Club's payment and registration page"
Depending on the number of offerings you are setting up and your tech grasp, this setup process can be as quick as 15 minutes. Meaning, no more chasing people for cheques, cash and registration forms.
STEP 1: CREATE A CHECKLICK ACCOUNT
This is the obvious first step and if you already have an account, move onto STEP 2. To create an account, click on the link below and you'll be taken your organization setup page.
STEP 2: LINK THE BANK ACCOUNT WHERE YOU'LL RECEIVE DEPOSITS
Once you've created an account, you'll want to link the bank account that you'll want to receive your deposits in.
We integrate with a payment processor called Stripe and depending on type of business you are setup as, Sole Proprietorship, Partnership, Corporation or Non-for profit, you may require the following information:
- Cheque or bank institution, branch and account number
- Social Insurance/Social Security Number for person representing the company (May be required to verify your identity)
- Date of Birth for the person representing the company
- Business Address, phone number, email
- c
- Revenue information
- A front and back photo of a Government issued photo ID will be required. A drivers license is ideal. (This is something that you will not be asked during this setup process however, you will be notified via email from Stripe usually within 2 months if ID upload is required)
NOTE: We recommend you use the same password for your Stripe account as you Checklick account. This is the only time you'll have to interact with Stripe unless you're changing your bank account information. Please keep your Stripe login credentials on file.
Here are the steps to linking your bank account:
- Log into your Checklick account
- Click on Storefront
- Click on Account Setup Required in the Bank Account Connection section

- Fill out the information and click on Authorize Access to this Account
- You can confirm your bank account is connected when you'll see a Stripe ID # under the Bank Account Connection

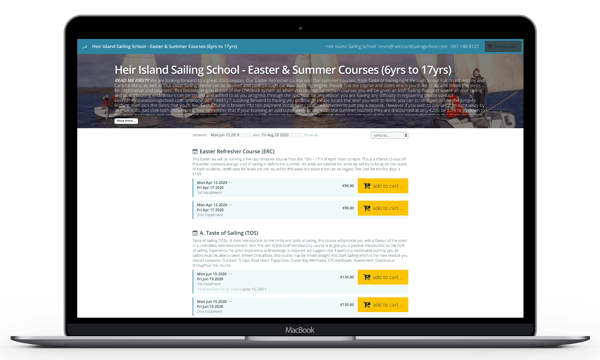
STEP 3: SELECT STOREFRONT URL
Choose your Storefront URL by typing the name of your organization. As an example, in the Storefront setup below, we use the link (https://monkeynastixhamilton.checklick.com).
If you're directing people from another webiste to your Storefront page, this is the link you'll want to pass along to your webiste administrator.

STEP 4: ENTER GENERAL INFO, UPLOAD BACKGROUND IMAGE, ORGANIZATION LOGO AND CONTACT INFO
- What services do you offer?
- What is unique about the services you provide?
- Does your organization have an interesting history?
- Is your organization a market leader in the services your offer?
- Is your organization located in a unique environment?
The General Information text is a great opportunity to showcase your organization. Consider the following when putting together the content;
Once you've completed your general information writeup, you'll want to upload a Background Image. Click here for an article on guideliness for selecting the perfect image for your background.
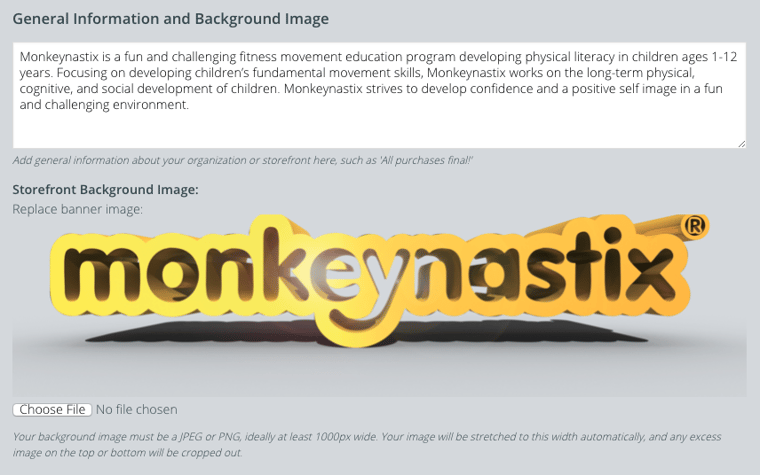
Critical step before you move on, click on Update Storefront at the top right of the page to save your changes.
Finally, you'll want to upload an Organization Logo. To upload your logo, follow these steps:
- Click on the Organization tab
- Scroll down to Organization logo
- Click on choose file and locate the logo you want to upload
- Click on Update Organization at the top right of the page
- In the dialog box labeled Organization Information, type in the information and this will be listed on your Storefront page as contact information for you Organization.
Ideally, you'll want to upload a transparent logo (PNG) format file. You can use a JPEG format as well however, a JPEG will not blend as nicely with the background.
Below, is a example of a Storefront on the left with a JPG logo and the right, a PNG image logo.
KEEP IN MIND THAT THROUGHOUT THE SETUP PROCESS, YOU CAN PREVIEW YOUR PAGE BY CLICKING ON PREVIEW ON THE BLACK SUB-HEADER.
STEP 5: STOREFRONT SETUP OPTIONS
Storefront Options allow you to configure Storefront payout options for your customers. To confiure Storefront Options, follow these steps:
- Go back to the Storefront tab
- Check the checkboxes that apply for the options you'd like to offer (Note the example on the illustration below)
- Click Update Storefront
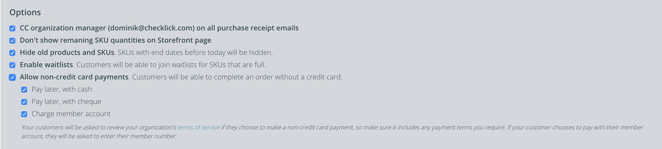
Here is an explanation for each one of the options:
CC organization manager on all purchase receipt emails - check this option if you'd like to receive a carbon copy email of all purchases that your customers make through your Storefront.
Hide old products and SKU's - is a way to decluter your Storefront Setup page. By checking this checkbox, you'll only see products with end dates as of today or later.
Require Consent - having this checked off, prompts your customers to agree to and sign off to your terms of service. Click the terms of service link for your Organization to take you to the Organization page where you can enter your terms and conditions.
Enable Waitlists - enabling waitlist will allow you customers to add themselves to a waitlist if one of your product offerings is full. If the customer is paying by credit card, they will be asked to enter their credit card details and will be notified that they won't be charged until you enroll them in the course. If you setup the option to pay later by cash, cheque or membership, they will enter their registration details but won't be registered until you enroll them in the course.
Allow non-credit card payments - you can select between options for your customers to register but pay later via cheque, cash or member charge. If you'd like to keep your accounting records in accurate, you'll need to reconcile these payment in your Checklick dashboard
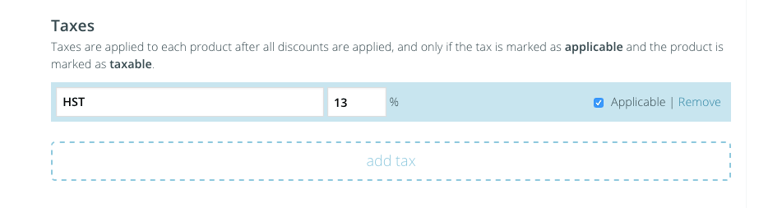
STEP 6: SETUP YOUR TAX STRUCTURE
In this step, you'll enter the tax rate that is applicable to your products. Keep in mind you'll be able to apply this tax rate to specific products afterwards.
- Scroll down close to the bottom of your Setup page to Taxes.
- Enter the tax rate you'd like to have the option to apply to your offerings. You can later apply this tax to each individual products.
- Click on Update Storefront
STEP 7: SETUP PRODUCTS AND SKU'S
To setup Products and SKU's, follow these steps:
- Scroll down to the Products section under Products, Discounts and Taxes
- Click on Add Product
- You will have 5 different type of product options to choose from, Class, Event, Membership, Item and Regatta
- Enter your Products name, details and the type of Product (An example of a 365 day membership is illustrated below)
- If you'd like to apply taxes to this Product, make sure the Taxable checkbox is checked off
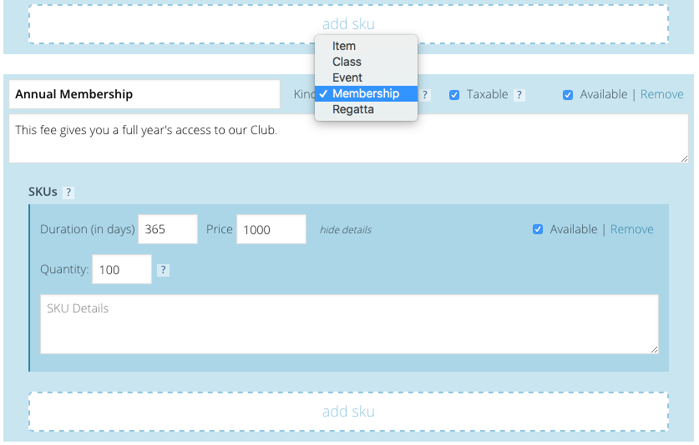
- Once you've entered your Product details, click on Add SKU and to expose additional options, click on show details
- Enter all the details and click on Update Storefront at the top right of the page
- To add Storefront Questions and SKU discounts to the product you entered, Scroll down to the Product section of the Setup page and find you newly entered Product
STEP 8: SETUP ORDER AND SKU DISCOUNTS
There are 2 types of discounts you can apply in Checklick and each discount can be setup as a dollar of percentage based discount.
Order discounts - Are applied to entire orders which can be made up of any number of people and items
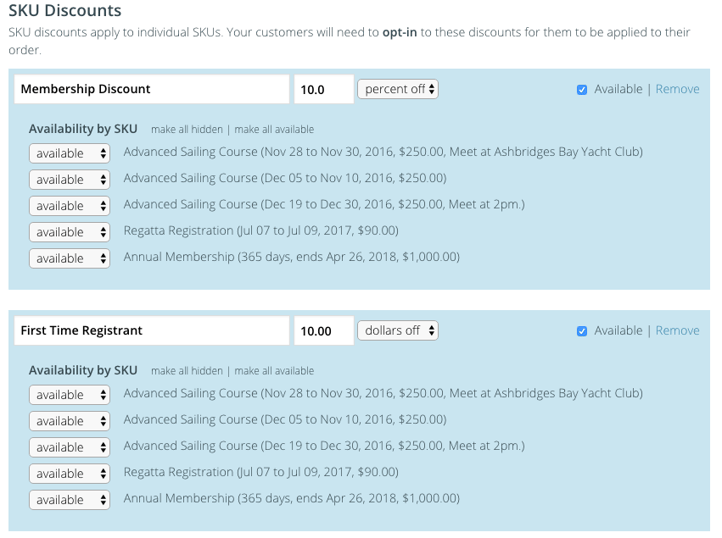
SKU discounts - Are applied to specific SKU's determined by you
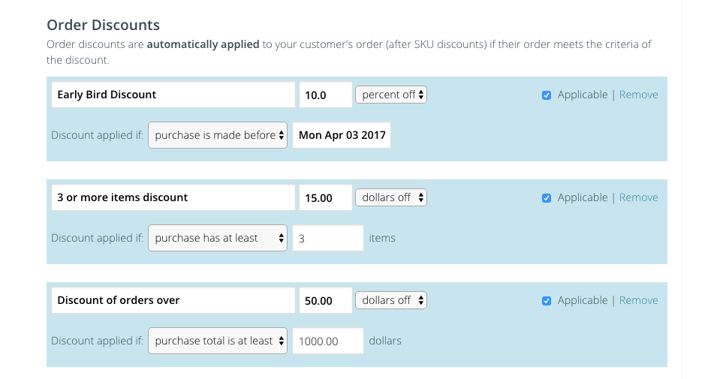
When applying Order Discounts, there are 3 different types of discounts you can setup as shown in the example below:
Purchase is made before - Will apply to orders that have been purchased before the date you select.
Purchase has at least - Will apply to orders where a specific number of items have been purchased
Purchase total is at least - Will apply to orders where the order total is at least a specific amount
To setup Order discounts, scroll down to the Order Discounts section in your Setup page.
Once you've entered your desired order discounts, click on Update Storefront.
The available order discounts will be displayed on your Storefront page just below your Organization's General Information. In the the example of 3 order discounts that we have setup above, they would appear on your Storefront page exactly as in the image below.

To setup SKU discounts, scroll down to the SKU Discounts section in your Setup page. 3 different types of discounts are demonstrated in the image below.
Once you've finished entering your SKU discounts, click on Update Storefront.

Once you've clicked on Update Storefront, scroll back down to the SKU discounts section.
You'll notice you now have the option to apply these discounts to each one of the Product SKU's you created in Step 7. Use the "make all hidden" or "make all available" expedite the process.
Click on Update Storefront when finished.
STEP 9: SETUP STOREFRONT AND PROFILE QUESTIONS
Profile Questions and Storefront questions both serve their individual purpose. The difference between the two is as follows:
Storefront Questions - Are specific to each individual SKU that you enter. So as an example, if you are selling and item, "t-shirt", you can setup a question specific to that item such as, "what is your t-shirt size?". T-shirt size is specific to this particular item but may not necessarily be applicable to other items.
Profile Questions - These are questions that are asked of registrants regardless of what they are registering for. These questions will be part of the person's profile and not just related to a specific product that they are purchasing. For example, a "membership #" would be a more suitable Profile question since it applies to the individual and not necessarily what the individual it registering for.
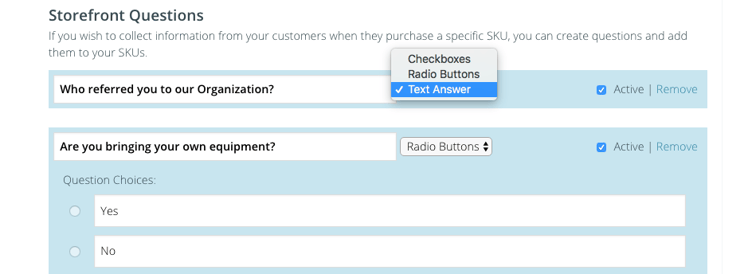
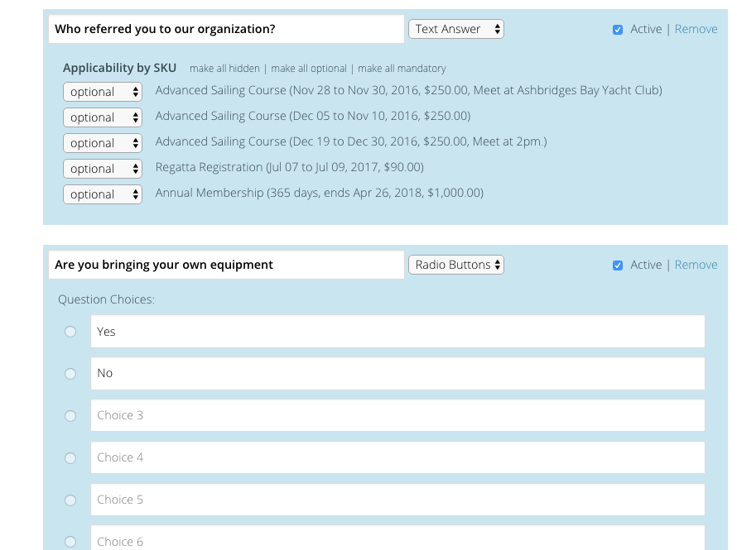
To setup Storefront questions, scroll down to the bottom of the setup page to the Storefront Questions section and enter you questions. 2 Storefront questions are demonstrated in the illustration below.
There are 3 available answer types of Storefront Questions:
Checkboxes - You can enter up to 10 choices where your customer can select multiple answers
Radio Buttons - You can enter up 10 choice where your customer can select one of the number of choices you present them with
Text Answer - You customer can enter text
Once you've entered your Storefront questions, click on Update Storefront.
After you've clicked on Update Storefront, scroll back down to the Storefront Questions section.
You'll notice you now have a "show options" button jus to the right of the dropdown question type menu. Click on "show options" and it will reveal all your SKU's. You will now be able to apply the question to each one of the Product SKU's you created in Step 7. Use the "make all hidden" or "make all optional" or "make all mandatory" to expedite the process.
Click on Update Storefront when finished.
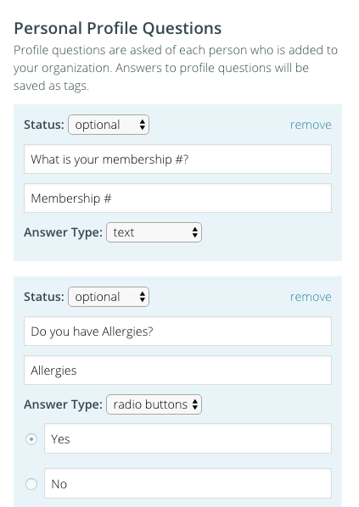
To setup Profile questions, click on the Organizations tab. First, under Personal Information Requirements, determine which information you would like to make Optional or Manadatory.

Once you've setup your Personal Information Requirements, scroll down to Personal Profile Questions.
Much like Storefront Questions, there are 3 available answer types of Profile Questions:
Checkboxes - You can enter up to 10 choices where your customer can select multiple answers
Radio Buttons - You can enter up 10 choice where your customer can select one of the number of choices you present them with
Text Answer - Your customer can enter text
When setting up profile questions, you'll want to enter the question that you want to ask of the your registrants. In the second text box, you'll enter the tag name. So as in the example below, the tag name will be "membership #", and the tag value will be the answer to the question you ask, i.e [Membership #: 1142]. This information can later be viewed on the persons profile or exported via spreadsheet. Once you've finished entering Profile questions, click on Update Organization.
STEP 10: PRE-LAUNCH CHECKLIST

STEP 11: LAUNCH STOREFRONT
Have you gone through your pre-launch checklist and you're ready to start accepting registrations and payments?
Final step, here we go! On your Setup page, check the Storefront Live checkbox and you're all set. Best of luck!

Copyright Checklick Inc. All Rights Reserved.
CHECKLICK STOREFRONT SETUP GUIDE (START TO FINISH)
INTRODUCTION:
This guide is intended for Checklick Storefront users but perhaps you're also searching for a payment and registration system and want to have a look at what settting one up entails.
This 11 step guide will take you from "Ok, where do I start?", to, "Here' a link to my Club's payment and registration page"
Depending on the number of offerings you are setting up and your tech grasp, this setup process can be as quick as 15 minutes. Meaning, no more chasing people for cheques, cash and registration forms.
STEP 1: CREATE A CHECKLICK ACCOUNT
This is the obvious first step and if you already have an account, move onto STEP 2. To create an account, click on the link below and you'll be taken your organization setup page.
STEP 2: LINK THE BANK ACCOUNT WHERE YOU'LL RECEIVE DEPOSITS
Once you've created an account, you'll want to link the bank account that you'll want to receive your deposits in.
We integrate with a payment processor called Stripe and depending on type of business you are setup as, Sole Proprietorship, Partnership, Corporation or Non-for profit, you may require the following information:
- Cheque or bank institution, branch and account number
- Social Insurance/Social Security Number for person representing the company (May be required to verify your identity)
- Date of Birth for the person representing the company
- Business Address, phone number, email
- c
- Revenue information
- A front and back photo of a Government issued photo ID will be required. A drivers license is ideal. (This is something that you will not be asked during this setup process however, you will be notified via email from Stripe usually within 2 months if ID upload is required)
NOTE: We recommend you use the same password for your Stripe account as you Checklick account. This is the only time you'll have to interact with Stripe unless you're changing your bank account information. Please keep your Stripe login credentials on file.
Here are the steps to linking your bank account:
- Log into your Checklick account
- Click on Storefront
- Click on Account Setup Required in the Bank Account Connection section
- Fill out the information and click on Authorize Access to this Account
- You can confirm your bank account is connected when you'll see a Stripe ID # under the Bank Account Connection
STEP 3: SELECT STOREFRONT URL
Choose your Storefront URL by typing the name of your organization. As an example, in the Storefront setup below, we use the link (https://monkeynastixhamilton.checklick.com).
If you're directing people from another webiste to your Storefront page, this is the link you'll want to pass along to your webiste administrator.
STEP 4: ENTER GENERAL INFO, UPLOAD BACKGROUND IMAGE, ORGANIZATION LOGO AND CONTACT INFO
- What services do you offer?
- What is unique about the services you provide?
- Does your organization have an interesting history?
- Is your organization a market leader in the services your offer?
- Is your organization located in a unique environment?
The General Information text is a great opportunity to showcase your organization. Consider the following when putting together the content;
Once you've completed your general information writeup, you'll want to upload a Background Image. Click here for an article on guideliness for selecting the perfect image for your background.
Critical step before you move on, click on Update Storefront at the top right of the page to save your changes.
Finally, you'll want to upload an Organization Logo. To upload your logo, follow these steps:
- Click on the Organization tab
- Scroll down to Organization logo
- Click on choose file and locate the logo you want to upload
- Click on Update Organization at the top right of the page
- In the dialog box labeled Organization Information, type in the information and this will be listed on your Storefront page as contact information for you Organization.
Ideally, you'll want to upload a transparent logo (PNG) format file. You can use a JPEG format as well however, a JPEG will not blend as nicely with the background.
Below, is a example of a Storefront on the left with a JPG logo and the right, a PNG image logo.
KEEP IN MIND THAT THROUGHOUT THE SETUP PROCESS, YOU CAN PREVIEW YOUR PAGE BY CLICKING ON PREVIEW ON THE BLACK SUB-HEADER.
STEP 5: STOREFRONT SETUP OPTIONS
Storefront Options allow you to configure Storefront payout options for your customers. To confiure Storefront Options, follow these steps:
- Go back to the Storefront tab
- Check the checkboxes that apply for the options you'd like to offer (Note the example on the illustration below)
- Click Update Storefront
Here is an explanation for each one of the options:
CC organization manager on all purchase receipt emails - check this option if you'd like to receive a carbon copy email of all purchases that your customers make through your Storefront.
Hide old products and SKU's - is a way to decluter your Storefront Setup page. By checking this checkbox, you'll only see products with end dates as of today or later.
Require Consent - having this checked off, prompts your customers to agree to and sign off to your terms of service. Click the terms of service link for your Organization to take you to the Organization page where you can enter your terms and conditions.
Enable Waitlists - enabling waitlist will allow you customers to add themselves to a waitlist if one of your product offerings is full. If the customer is paying by credit card, they will be asked to enter their credit card details and will be notified that they won't be charged until you enroll them in the course. If you setup the option to pay later by cash, cheque or membership, they will enter their registration details but won't be registered until you enroll them in the course.
Allow non-credit card payments - you can select between options for your customers to register but pay later via cheque, cash or member charge. If you'd like to keep your accounting records in accurate, you'll need to reconcile these payment in your Checklick dashboard
STEP 6: SETUP YOUR TAX STRUCTURE
In this step, you'll enter the tax rate that is applicable to your products. Keep in mind you'll be able to apply this tax rate to specific products afterwards.
- Scroll down close to the bottom of your Setup page to Taxes.
- Enter the tax rate you'd like to have the option to apply to your offerings. You can later apply this tax to each individual products.
- Click on Update Storefront
STEP 7: SETUP PRODUCTS AND SKU'S
To setup Products and SKU's, follow these steps:
- Scroll down to the Products section under Products, Discounts and Taxes
- Click on Add Product
- You will have 5 different type of product options to choose from, Class, Event, Membership, Item and Regatta
- Enter your Products name, details and the type of Product (An example of a 365 day membership is illustrated below)
- If you'd like to apply taxes to this Product, make sure the Taxable checkbox is checked off
- Once you've entered your Product details, click on Add SKU and to expose additional options, click on show details
- Enter all the details and click on Update Storefront at the top right of the page
- To add Storefront Questions and SKU discounts to the product you entered, Scroll down to the Product section of the Setup page and find you newly entered Product
STEP 8: SETUP ORDER AND SKU DISCOUNTS
There are 2 types of discounts you can apply in Checklick and each discount can be setup as a dollar of percentage based discount.
Order discounts - Are applied to entire orders which can be made up of any number of people and items
SKU discounts - Are applied to specific SKU's determined by you
When applying Order Discounts, there are 3 different types of discounts you can setup as shown in the example below:
Purchase is made before - Will apply to orders that have been purchased before the date you select.
Purchase has at least - Will apply to orders where a specific number of items have been purchased
Purchase total is at least - Will apply to orders where the order total is at least a specific amount
To setup Order discounts, scroll down to the Order Discounts section in your Setup page.
Once you've entered your desired order discounts, click on Update Storefront.
The available order discounts will be displayed on your Storefront page just below your Organization's General Information. In the the example of 3 order discounts that we have setup above, they would appear on your Storefront page exactly as in the image below.
To setup SKU discounts, scroll down to the SKU Discounts section in your Setup page. 3 different types of discounts are demonstrated in the image below.
Once you've finished entering your SKU discounts, click on Update Storefront.
Once you've clicked on Update Storefront, scroll back down to the SKU discounts section.
You'll notice you now have the option to apply these discounts to each one of the Product SKU's you created in Step 7. Use the "make all hidden" or "make all available" expedite the process.
Click on Update Storefront when finished.
STEP 9: SETUP STOREFRONT AND PROFILE QUESTIONS
Profile Questions and Storefront questions both serve their individual purpose. The difference between the two is as follows:
Storefront Questions - Are specific to each individual SKU that you enter. So as an example, if you are selling and item, "t-shirt", you can setup a question specific to that item such as, "what is your t-shirt size?". T-shirt size is specific to this particular item but may not necessarily be applicable to other items.
Profile Questions - These are questions that are asked of registrants regardless of what they are registering for. These questions will be part of the person's profile and not just related to a specific product that they are purchasing. For example, a "membership #" would be a more suitable Profile question since it applies to the individual and not necessarily what the individual it registering for.
To setup Storefront questions, scroll down to the bottom of the setup page to the Storefront Questions section and enter you questions. 2 Storefront questions are demonstrated in the illustration below.
There are 3 available answer types of Storefront Questions:
Checkboxes - You can enter up to 10 choices where your customer can select multiple answers
Radio Buttons - You can enter up 10 choice where your customer can select one of the number of choices you present them with
Text Answer - You customer can enter text
Once you've entered your Storefront questions, click on Update Storefront.
After you've clicked on Update Storefront, scroll back down to the Storefront Questions section.
You'll notice you now have a "show options" button jus to the right of the dropdown question type menu. Click on "show options" and it will reveal all your SKU's. You will now be able to apply the question to each one of the Product SKU's you created in Step 7. Use the "make all hidden" or "make all optional" or "make all mandatory" to expedite the process.
Click on Update Storefront when finished.
To setup Profile questions, click on the Organizations tab. First, under Personal Information Requirements, determine which information you would like to make Optional or Manadatory.
Once you've setup your Personal Information Requirements, scroll down to Personal Profile Questions.
Much like Storefront Questions, there are 3 available answer types of Profile Questions:
Checkboxes - You can enter up to 10 choices where your customer can select multiple answers
Radio Buttons - You can enter up 10 choice where your customer can select one of the number of choices you present them with
Text Answer - Your customer can enter text
When setting up profile questions, you'll want to enter the question that you want to ask of the your registrants. In the second text box, you'll enter the tag name. So as in the example below, the tag name will be "membership #", and the tag value will be the answer to the question you ask, i.e [Membership #: 1142]. This information can later be viewed on the persons profile or exported via spreadsheet. Once you've finished entering Profile questions, click on Update Organization.
STEP 10: PRE-LAUNCH CHECKLIST
STEP 11: LAUNCH STOREFRONT
Have you gone through your pre-launch checklist and you're ready to start accepting registrations and payments?
Final step, here we go! On your Setup page, check the Storefront Live checkbox and you're all set. Best of luck!
Copyright Checklick Inc. All Rights Reserved.